A place to display my crafts, card making, scrapbooking, and news

Crafts, cardmaking, scrapbooking, and day to day

Thursday, June 4, 2015

How to paint Japanese Cherry Blossom Tree painting!

Hello! I am so excited to finally share my step by step painting with you. By following this post, you should be able to paint your own Japanese Cherry Blossom Tree! It really is easy and the break down of each step helped me recreate my painting when I got home that night. My friend Marla, and I always wanted to try painting. We had heard about the easy painting nights friends had had, but this was our first one. It is amazing how a few lines, some blobs, and blending created this beautiful painting.
Supplies: Ready made Canvas, a medium and a large paint brush, hot pink, red, cobalt blue, black, gold, jade green, and white acrylic paints. Brushes were cheap and they work just fine!  Here's how you get started, paint three black lines with the large brush. One at the top, one near the bottom, and one at the very bottom They should not be perfect. Mine certainly are not!
Here is the painting we are recreating on the left and the instructor painting with us.
Here's my friend Marla painting while baby Natalie sleeps in her snuggy.

Step 2: Paint a blue line under the top black line and above the bottom two lines with the large paintbrush.
Step 2 Paint white on the white areas of your canvas. Go to where the blue lines where painted and blend that in with the white. This will make the sky and the water. Use lots of white paint! We tried to make wiggles in the water to look more like waves and ripples. Feel free to add more blue if you want. I did. I added lots of blue because the sample we started with had blue on the sides and I liked that better than the more white the instructor was doing.
Marla was going for a more of a impressionism look. It was girl's night out, hence the crowns! The most important step throughout this process to have fun! Her technique really made that water come to life!
Step 3: Now add gold to the bottom of the middle black line and in the water with the large paint brush


Step 4: Add gold lines short then longer to each side of the water and some in the water.

Step 5: starting at the bottom of your canvas paint a slanted line up towards the left of the canvas. This becomes the tree trunk. Then paint branches with the smaller brush.

Using some gold paint, add lines of gold to the base of the tree trunk and on the top of all the branches.
I know it looks like quite the challenge, but it was very easy. The next part was the most fun. You start with red paint on your medium brush and you just put dabs of paint on the branches in clusters. Then you go down to the bottom of the painting and add dots of the red over the gold and green you created. Those dots become the petals of the tree. Then you will go back in with hot pink and dab over the red and add new patches of pink to the branches and to the land below. Then you go in with white and you do the same dabbing technique until you get the tree as full of petals as you want. You might do like me and think you have way too much white and go back in with the red and the pink until you have it the way you like it. It is your painting and you should have fun with it! I also used the back of my brush and wadded up paper towels to make more interesting petals. I also tried to add as much paint as possible so the canvas had texture like in an oil painting.

Here is Marla beginning to fill in her tree.

After I finished my petals, I felt like my painting was way too white. I went back in and added more blue to the sides of the painting and to the water. Here's Marla standing by our paintings.

Here's the finished painting the Artist was painting along with us. 

Here is Marla and I proudly behind our first painting ever!

Here is my painting after it had dried and a better close up of it:

I went home two days later and used my painting and these step by step pictures to paint three mini paintings and I painted a card for Mother's day gifts.
The card was 5x7 regular white card stock. I painted right on the card and had no trouble. The only thing I did different was to add glossy mod podge to the tree truck and the petals of the tree to make it stand out. That made the cheap acrylic paint I used more vibrant. I didn't add the mod podge until the painting s were completely dry. I signed my name in black sharpie at the bottom. The paints were a huge hit! Mom wants to have here painting framed. The little canvases I found at Michaels and they are 8x10 I think. The paint i used was apple barn ones brought a long time ago at Walmart. It goes to show you can have good results even with cheap paint and you don't have to have any special training to make a masterpiece (or 5). I hope you will attempt this painting, and if you do please share a photo! I would love to see it. Thank you for stopping by!! Have you ever tried any of these painting parties? I'd love it if you shared your experience and the painting you made!

Tuesday, June 2, 2015

Oalf card

Welcome! Today I am finally getting to showcase a fun card I made with this month's Stamp of the Month and the ever popular Oalf from Frozen! I have a good friend that was able to use inkscape and create Oalf for me. I cut him with my Cricut Explore and paper pierced him together. I designed this card especially for my twin cousins Alice and Evelyn. Alice loves chocolate ice cream and Evelyn loves popsicles. As a CTMH consultant, I got to buy the stamps of the month when the new catalog was available to us last July. July is my birthday month and my gift to myself was a ton of new CTMH products which included this stamp and all the Shinhan markers CTMH carries!! I love beign a CTMH consultant and getting all the inside news on upcoming products and specials. I have been excited to share this card with you! Let's get started!
 
The process for making this card started in Cricut Design Space. I cut each piece in white and colored with the Shinhan markers as I wanted him to have shading.

Here's all the pieces cut and hand colored:


I used CTMH Lagoon Ink and stamped on CTMH Lagoon paper the ice cream and the popsicles for the front of the card back ground

I stamped images from the June Stamp of the Month on white card stock and I cut them out.
I colored each image with the Shinhan Touch Twin Alchol markers. This was my first time to work with them. I really enjoyed the shading! Here's the inside of the card:

Here's the completed card with Olaf holding the ice cream and popsicle!
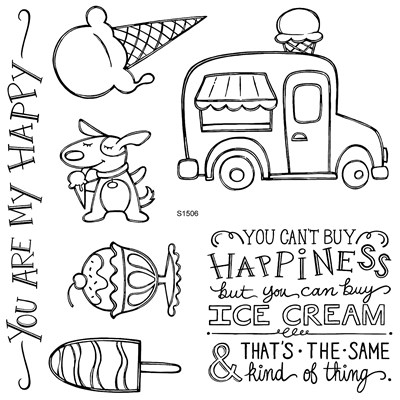
I hope you enjoyed this card today. I was told the girls loved their cards! Now that we are into warmer months, it is time to get this stamp set out and make more fun art! Here's what this fun stamp set looks like and the blocks needed:
 
 
S1506 Ice Cream Dream, set of 7
Recommended Blocks:
2" × 2" (Y1003)
3" × 3" (Y1006)
2" × 6 1/2" (Y1010)
4" × 5" (Y1012)
The stamp set is only $5 with a $50 purchase at my CTMH website. Thank you for stopping by. I would appreciate your business. http://frommtheheart.ctmh.com/ is my website. Click shop at the top of the page. If you want to be this month's hostess and get great discounts on all the amazing CTMH products, then comment here on this blog post and I will get in touch with you!!  


Monday, June 1, 2015

June CTMH specials!

Welcome to June CTMH specials! Every month I am amazed at the special that CTMH has come up with. This is another fun one!

Summer Crush

The Perfect Companion for Memory Keeping On The Go

Summer Crush
During the month of June, when you purchase any My Crush® book and its accompanying assortment pictured in Annual Inspirations 2014–2015, you will receive the coordinating stamp set FREE! That is a savings of at least $9.95 USD / $10.95 CAD! Choose from five lovely My Crush book offerings that will provide a swoon-worthy background for your favorite memories. From family reunions to camping adventures to holiday countdowns—and much more—you will be crushing on all these books and the possibilities they provide. Every My Crush book features a hard cover with wire binding and cardstock-weight pages that are printed with eye-catching designs to form the perfect bases for your memory keeping. Additionally, each My Crush book also features unique details—from glossy print, to vellum pages, to gold foil, to ink-resistant patterns—that make displaying your personality easier than ever. Plus, once you add the artistry of the coordinating assortments featuring sticker sheets, envelopes, alphabets, cards, and journaling spots, along with your free stamp set, you will be well on your way to your own gorgeous mini book creation! This offer is only available while supplies last* and once they’re gone, these books are gone for good, so put your orders in early to get your summer romance rolling today!
Contact me for more details.

Check Out the Combos!

Add to cartMy Crush® In the Pink Combo
Purchase the My Crush® In the Pink Book with the My Crush® In the Pink Assortment and get the My Acrylix® Glitter Glam B-size stamp set for free!


Add to cartMy Crush® Wildwood Combo
Purchase the My Crush® Wildwood Book with the My Crush® Wildwood Assortment and get the My Acrylix® Born to Roam B-size stamp set for free!


Add to cartMy Crush® Holiday Happenings Combo
Purchase the My Crush® Holiday Happenings Book with the My Crush® Holiday Happenings Assortment and get the My Acrylix® Magical Moment C-size stamp set for free!


Add to cartMy Crush® Modville/Besties Combo
Purchase the My Crush® Modville Book with the My Crush® Besties Assortment and get the My Acrylix® Reel Life B-size stamp set for free!


Add to cartMy Crush® Modville/Best Day Ever Combo
Purchase the My Crush® Modville Book with the My Crush® Best Day Ever Assortment and get the My Acrylix® Reel Life B-size stamp set for free!


Add to cartMy Crush® Bluebird/Memories Combo
Purchase the My Crush® Bluebird Book with the My Crush® Memories Assortment and get the My Acrylix® Love This B-size stamp set for free!


Add to cartMy Crush® Bluebird/Favorites Combo
Purchase the My Crush® Bluebird Book with the My Crush® Favorites Assortment and get the My Acrylix® Love This B-size stamp set for free!


*Offer valid June 1, 2015 (9:00 am MDT)–June 30, 2015 (11:59 pm MDT). No tax will be charged on the free items. Shipping/handling is calculated based on the full retail price of the free stamp.


 That amazing deal is not the only one this month!!! Check out one of my favorite stamp sets in the catalog that is only available in June!!  

Stamp of the Month

June 2015: Ice Cream Dream


fpo
S1506 Ice Cream Dream, set of 7

Recommended Blocks:
2" × 2" (Y1003)
3" × 3" (Y1006)
2" × 6 1/2" (Y1010)
4" × 5" (Y1012)

Beautiful Stamps, Amazing Discounts

Each month you can purchase a new D-size stamp set, available for one month only, for just $5— that’s over 70% off retail! When you place an order of $50 or more in Close To My Heart products (excluding purchases made in Studio J®), you qualify for this special Stamp of the Month pricing.

June 2015: Ice Cream Dream (S1506)

Spend $50 and get this Stamp of the Month set for just $5.

 
Stay tuned for a really fun card I made with this amazing stamp of the month and I took a few pictures of the my crush book I brought my cousin. So much fun for school aged kids of any age or to showcase special trips. I have been noticing a lot of people have been tearing the pages out of the book and making cards or home decor. Thank you for stopping by!!!